
Kettlebell Handle Grip: Technique, Variations, and a Smarter Way to Secure Your Hold
Share
Kettlebells reward precision. A few millimeters of handle placement can be the difference between a crisp swing and a forearm bang; a slight wrist angle can make a clean float or crash. “Kettlebell handle grip” isn’t just about holding on—it’s about shaping the arc, protecting your wrists and elbows, and transferring power from hips to bell without leaks. This guide walks through the key grips for swings, cleans, snatches, presses, and rows; how to size and “index” your grip to the handle; common mistakes; and where PTI Grip fits as a fast, clamp-on complement to straps for the rest of your training week.
(New to the tool itself? A quick skim of the kettlebell overview helps anchor the terminology.)
The Foundations: Handle, Chalk, and Contact
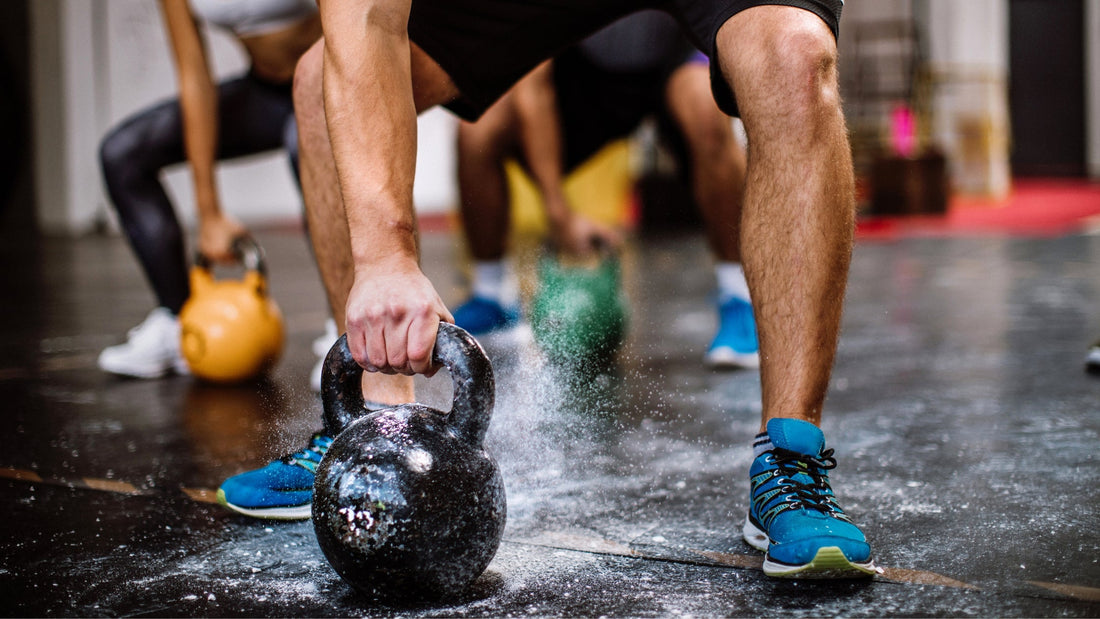
Handle geometry matters. Most bells have a continuous, curved handle with varying thickness. The center (crown) is typically thicker; the corners taper slightly. Knowing where the handle is thinnest can help you place your fingers for better purchase on heavy bells.
Chalk lightly, not lavishly. A dusting improves friction; caking creates paste that slides once sweat hits. With kettlebells, chalk tends to migrate across the horn during high-rep sets, so keep the layer thin and refresh sparingly.
Hand care is grip care. File calluses, keep nails short, moisturize lightly on off days. Rough edges catch the horn, creating hot spots and tears during swings and snatches.
Core Kettlebell Handle Grips by Movement
1) The Hinge Grip (Two-Hand Swing)
-
Placement: Hands meet at the center with fingers interlaced around, not over, each other. Thumbs point toward one another.
-
Pressure: Most pressure through the last two fingers (ring and pinky). This “hook” keeps your forearms quiet and lets the hips drive.
-
Cue: “Hinge, hike, snap.” Let the handle sit diagonally across the palm so the bell can float without peeling your thumbs apart.
Common mistakes: White-knuckling through the index finger and thumb (fatigues grip early), and letting the bell arc too high (shoulders take over, hands get torqued).
2) The One-Hand Swing Grip
-
Placement: Hand sits closer to the corner of the handle rather than dead center. This gives the bell room to rotate around the hand during the float.
-
Wrist: Neutral—avoid flexing or over-extending. A neutral wrist lets the horn slide smoothly without ripping calluses.
-
Fingers: Again, the hook comes from the last two fingers. Think “loose–tight–loose”: relaxed during backswing, firm at hip snap, relaxed again at the float.
Common mistakes: Gripping in the exact middle (forces the bell to slam forearm) and gripping too deep into the palm (creates friction hotspots).
3) The Clean Grip (Rack Transition)
-
Goal: Land the bell quietly in the rack—forearm vertical, elbow close, wrist neutral.
-
Placement: As the bell passes the navel on the upswing, let the handle roll diagonally through the fingers. Your hand rotates around the horn; the bell wraps around the forearm rather than flipping over it.
-
Rack feel: Handle sits across the heel of the palm; the corner of the horn nests between thumb and index. Forearm is the shelf, not your wrist.
Common mistakes: Death-gripping through the turnover (causes the bell to crash), and letting the wrist break back (irritates tendons).
4) The Snatch Grip (Overhead Transition)
-
Turnover timing: As hips finish, the hand “punches” through the handle. The bell rolls around the hand and lands softly overhead.
-
Handle interface: Start at the corner on the backswing; pass through center as you punch. The bell should settle into the web between thumb and index with a stacked wrist.
-
Overhead fix: Think “vertical knuckles” and “long wrist.” This keeps the horn from digging into the palm.
Common mistakes: Early arm pull and late hand insertion, which lead to forearm slap and torn calluses.
5) Presses and Jerks (Rack to Overhead)
-
Rack grip: Diagonal across the palm; wrist straight. The heel of your palm, not your fingers, bears the handle.
-
Press path: As the bell rises, rotate your hand slightly so the wrist stays neutral and the handle continues to sit diagonally, not flat across finger pads.
-
Lockout: Fingers relaxed; shoulder stacked; bell resting comfortably over the forearm.
Common mistakes: Flat “pancake” grip (collapses wrist), and squeezing hard the whole time (forearm fatigue before delts and triceps are taxed).
6) Rows and Carries
-
Rows: Use a hook emphasis with last two fingers; keep the wrist long to avoid curling the bell with the thumb pad.
-
Suitcase carries: Grip closer to the corner for a natural wrist angle; ribs down; don’t let the bell drag the hand into ulnar deviation.
Sizing and Indexing Your Grip
-
Handle thickness: If your bell has a thick horn, bias contact toward the fingers (not deep in the palm). If the horn is thinner, a slightly deeper set can feel secure without pinching.
-
Corner use: In one-hand work, the corner gives the bell a rotational path around your hand. Centering the grip in ballistic moves often equals forearm slap.
-
Diagonal line: For cleans and presses, the handle should draw a diagonal across your palm—from base of index toward the opposite heel—so the wrist stays neutral.
Save Your Skin: Micro-Adjustments That Matter
-
Relax on the backswing. Let the handle migrate subtly; don’t sandpaper your palm by clamping the whole arc.
-
Re-chalk mid-set only if needed. Breaking rhythm to bathe your hands wastes the elastic rebound of the hinge.
-
Rotate bells if possible. Aggressive powder-coated handles chew hands more than smooth steel; mix implements across volume.
Programming the Grip, Not Just the Lift
-
Accumulation phase: Sets of 10–15 one-hand swings, EMOM or every-30-seconds, focusing on loose–tight–loose rhythm.
-
Turnover phase: Clean ladder (1-2-3-4 each side) emphasizing silent rack landings—no forearm bang.
-
Snatch practice: Singles on the minute for 10–15 minutes, staying submaximal and clean overhead.
-
Press integrity: 5×5 with a bell you can hold overhead for 20–30 seconds per side without wrist collapse.
-
Grip finishers (sparingly): Suitcase carry intervals, 20–40 meters per hand, staying tall and neutral.
Where PTI Grip Fits in a Kettlebell-Centric Week
Straps are rarely used directly on kettlebell horns, and that’s fine—save them for your heaviest barbell pulls and rack pulls when forearm endurance isn’t the training goal. The rest of your week, especially when you hop between kettlebells, barbells, and machines, is where PTI Grip shines as a complement to straps:
-
Fast transitions: Supersets like KB cleans → barbell rows → cable pull-downs are smoother when you can clamp, lift, and release in seconds—no wrapping and unwrapping fabric between stations.
-
Keep bar feel: The clamp preserves bar diameter and transmits knurl texture, so your technique cues stay sharp on barbell work while your hands recover from high-rep kettlebell sets.
-
Accessory volume without slip: On sweaty back-off sets (rows, RDLs, lat pull-downs), the clamp maintains traction without chalk clouds or rubber sleeves.
-
Hygiene and maintenance: No sweat-soaked straps to wash; wipe the clamp and move on.
Learn about the engineering and mission behind it in Our Story
Note: PTI Grip is designed for straight bars and many machine/dumbbell handles. Some kettlebell horns—especially very thick or highly curved ones—may not be compatible. Use it to streamline the barbell and cable parts of your session that surround your kettlebell work, not to change how a KB sits in the rack or overhead.
Troubleshooting: Quick Fixes for Common Kettlebell Grip Problems
-
Forearm slap on cleans/snatches: You’re pulling early or gripping in the center. Delay the arm pull, grip nearer the corner, and “punch through” at the turnover so the bell wraps, not flips.
-
Hot spots and tears: Your hand isn’t moving with the handle. Relax during the backswing and float. File calluses after training, not before.
-
Wrist pain on presses: The handle is flat across finger pads. Re-set diagonally across the palm and stack the forearm vertical in rack and lockout.
-
Grip fades before hips: Shift emphasis to last two fingers; let the index/thumb guide, not crush. Practice loose–tight–loose rhythm.
-
Bell drifts off midline: Check your hinge. If the handle travels low and away, your lats aren’t engaged. Keep the bell close and high during the hike.
Putting It All Together
Mastering kettlebell handle grip is about letting the horn move when it should (ballistics) and anchoring it when it must (rack and lockout), all while protecting the skin and keeping the wrist long. Use corner placement on one-hand swings and snatches to smooth the turnover; use a diagonal palm line in rack and presses to keep the joint stacked. Build tolerance progressively, not by gritting your teeth through torn calluses.
For the rest of your strength week—when you jump from kettlebells to barbells and machines—pair your heavy strap work with the speed and cleanliness of PTI Grip. Straps handle the absolute loads; PTI Grip keeps everything else moving without slip, mess, or lost bar feel. That combo protects your hands, respects your technique, and lets you focus on the good stuff: crisp snaps, quiet landings, and strong, repeatable lifts.